How to configure Super Link module?
After you finish adding the module on a page, you can click “Management Center” and enter following page.
On “Choose Link Type” page, there are seven kinds of link types to choose. We advise that you could choose link type firstly, then go to “Manage Link” page and add links.
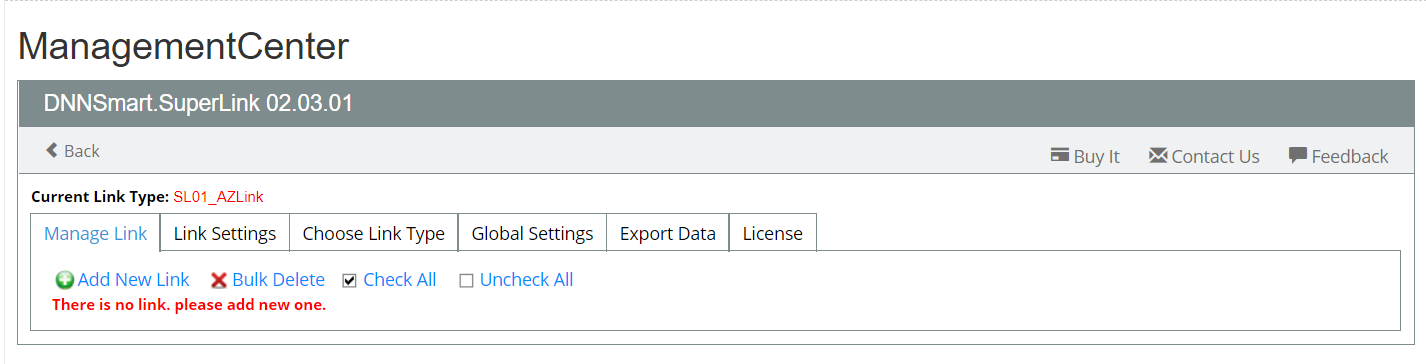
Manage Link
On this page, we can add, edit or delete links. No matter which link type you choose, operation on “Manage Link” is almost the same. In our clarifications below, we apply SL01_AZLink as example.
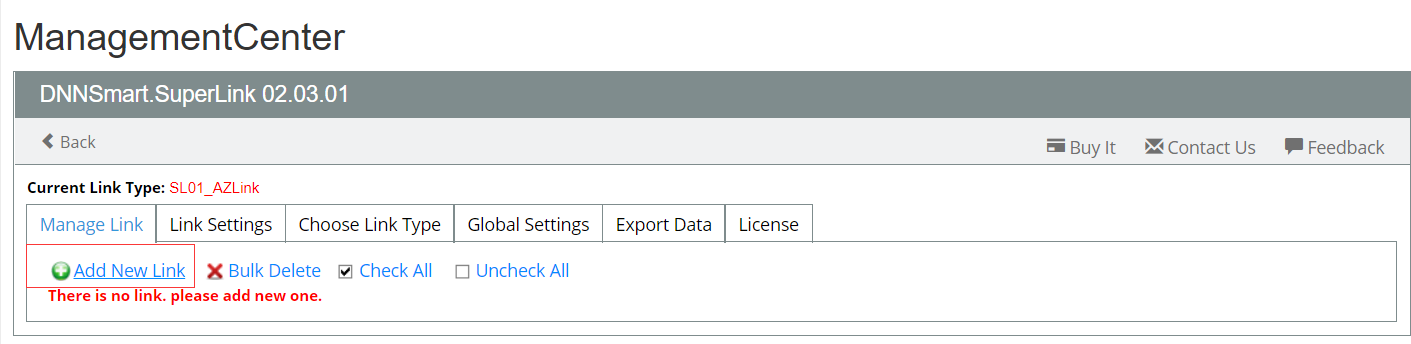
How to add links?
Firstly, please go to “Manage Link” page and click “Add New Link”.
After that, we will enter following interface.
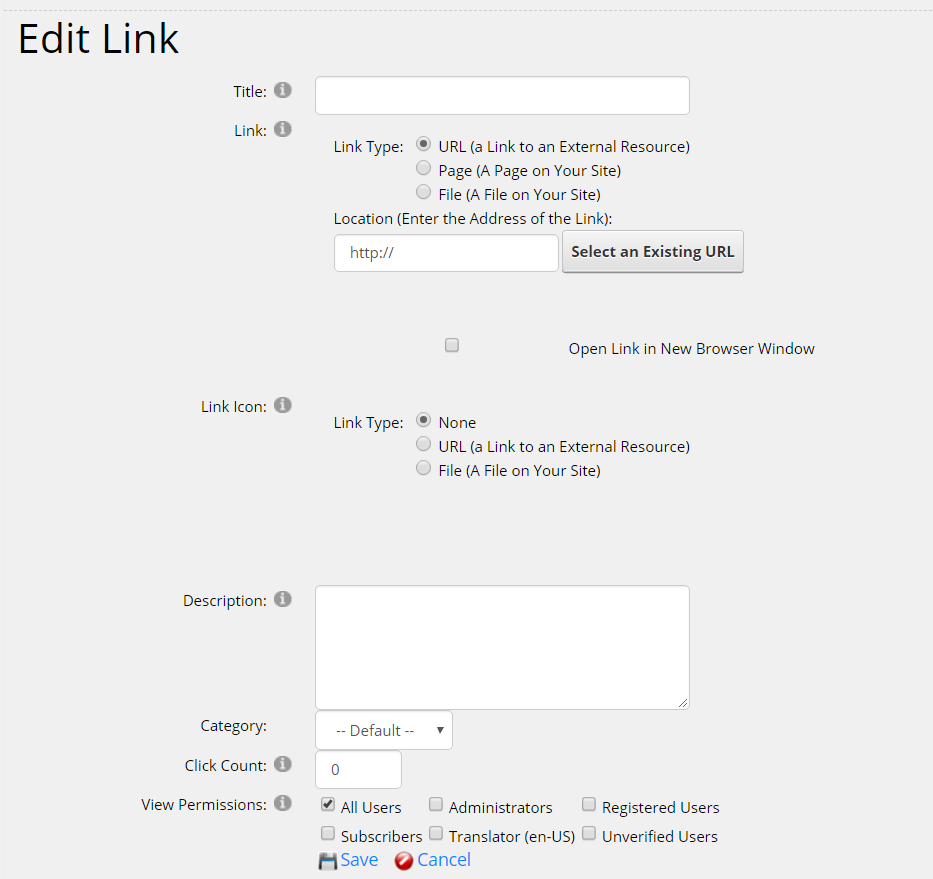
For each option, we have clarifications as below.
Title: Please input the title of the link here.
Link:
There are three radio buttons here. If you choose “URL”, it means that it will link to an external link filled by you. If you choose “Page”, it means that it will link to a page on your site. If you choose “File”, it means that it will link to a file on your site.
Link Icon: This is the icon of the link. If you choose “None”, it means that it won’t include any icon. If you choose “URL”, it means that the link icon is from an external link. If you choose “File”, it means that the link icon will be a file on your site.
PS: For SL01_AZLink, it won’t include any link icon. So we can choose “None” here.
Description: Please input description for the link.
Category: This option is only used in “SL02_CategoryLink” and SL06_TreeLink. In other link types, you can disregard this.
Click Count: You can input a number here.
View Permissions: You can choose which roles can view this link.
How to manage added links?
We added several links, then “Manage Link” page will display as below.
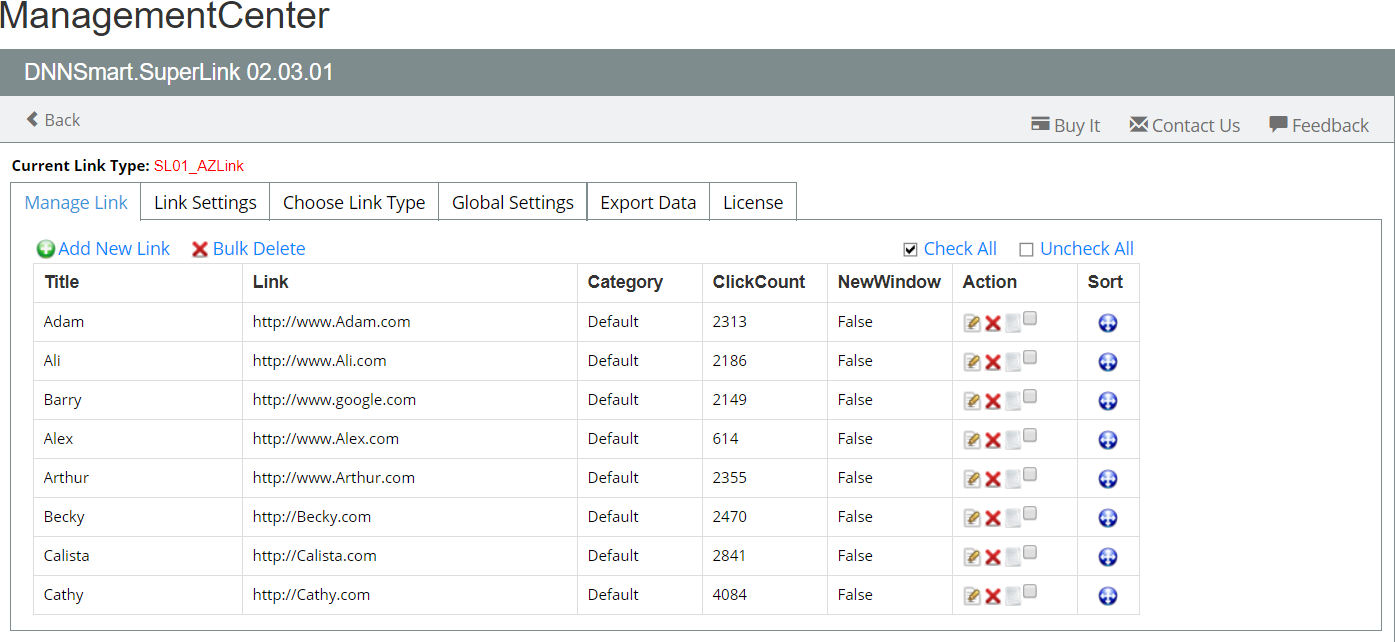
Sort Feature
Through dragging the blue icon under field “Sort”, you can sort added links. However, in SL01_AZLink, this sort feature doesn’t make any sense because front-end links will sort according to initials.
Bulk Deleting Feature
There’s one checkbox included in each link. When you want to delete added links in batches, please choose those ones at the same time and then click “Bulk Delete”.
Link Report
After clicking the third icon in each link, you will be taken to a page where it shows the click report of that link.
For example, after we clicked the “link report” icon in the first link, we entered the page as below.

Manage Category
When you add links in “SL02_CategoryLink” and “SL06_TreeLink”, you can categorize them. On this page, you can add, edit or delete categories.
Please note, this page won’t exist in other five link types.
After you enter this page, you will see following interface. (We use SL02_CategoryLink as an example.)
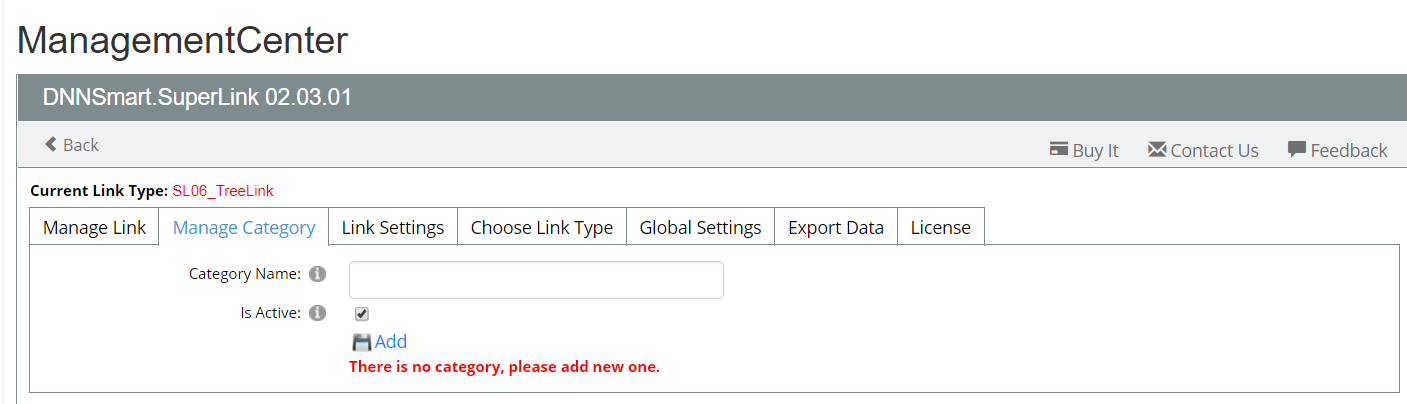
Category Name: Please input a name for this category.
Is Active: Whether to activate this category.
We added several categories, then Manage Category page will display as below.
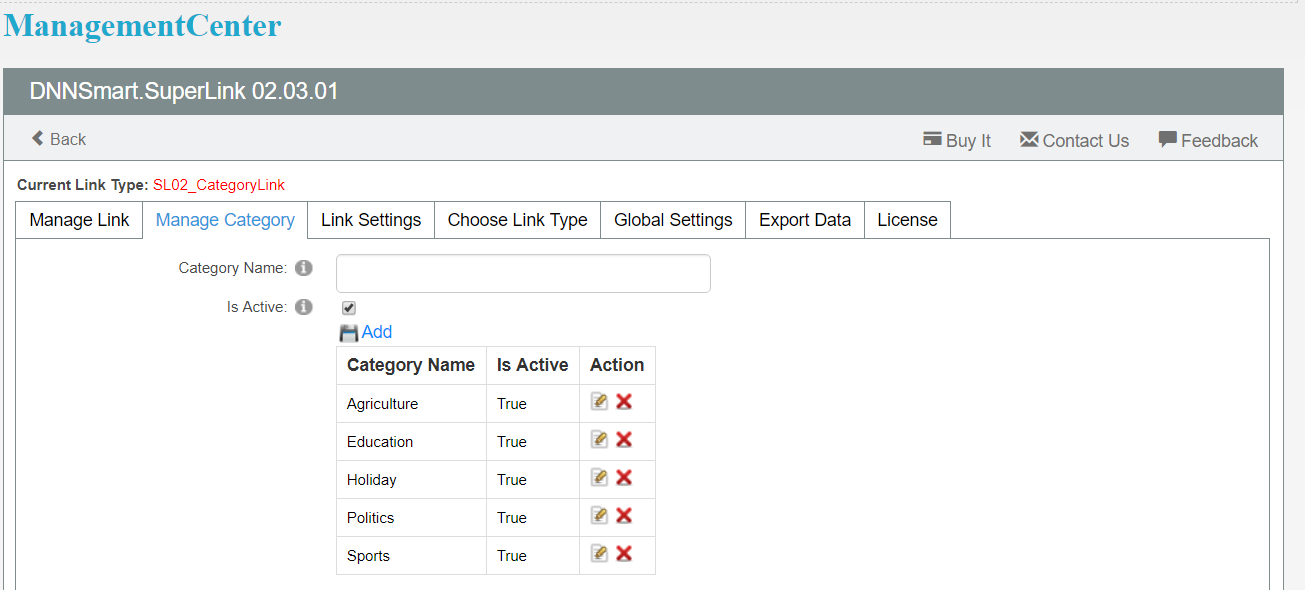
You can click pencil icon to edit that category, such as changing category name. Through clicking delete icon, you can delete that category directly.
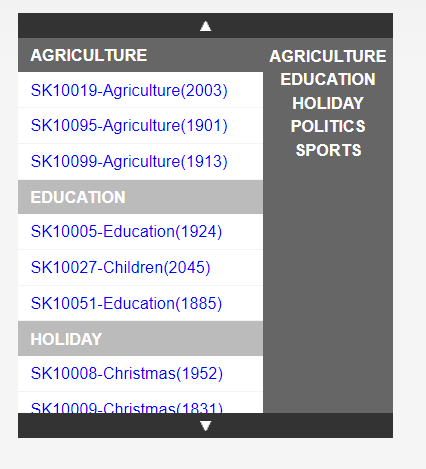
After we added several links and categories, you can see front-end interface as below.
Link Settings
On this page, you can do some basic settings for added links.
Please note, SL01_AZLink and SL02_CategoryLink have the same link settings page, the rest five kinds of link types include different link settings page. Next, we will explain them one by one.
SL01_AZLink & SL02_CategoryLink
After you apply “SL01_AZLink” or “SL02_CategoryLink” on “Choose Link Type” page, Link Settings page will display as below.
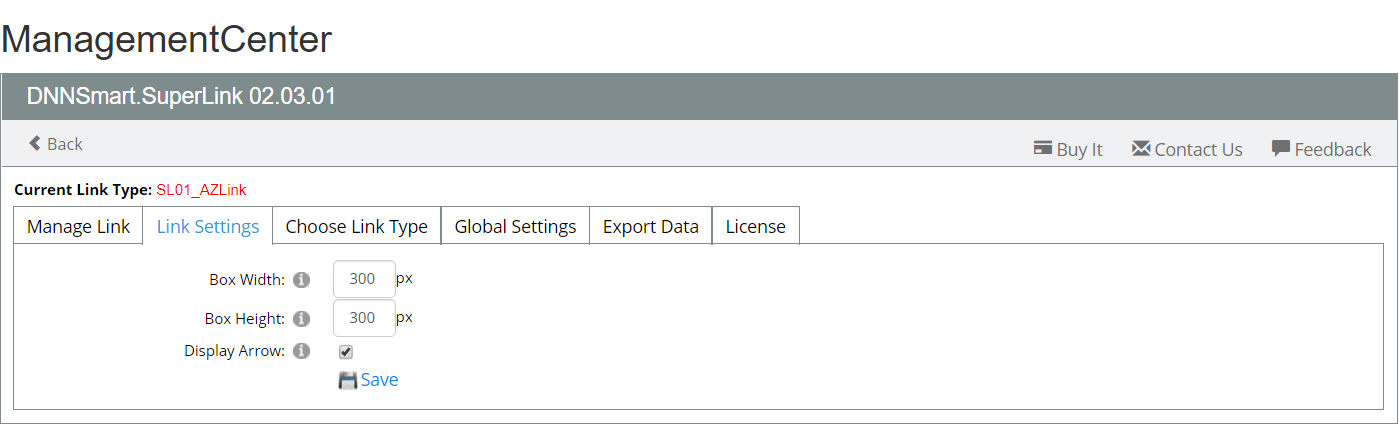
Box Width: This option will be only used in “SL01_AZLink” and “SL02_CategoryLink”.
It’s the width of box.
Box Height: This option will be only used in “SL01_AZLink” and “SL02_CategoryLink”.
It’s the height of box.
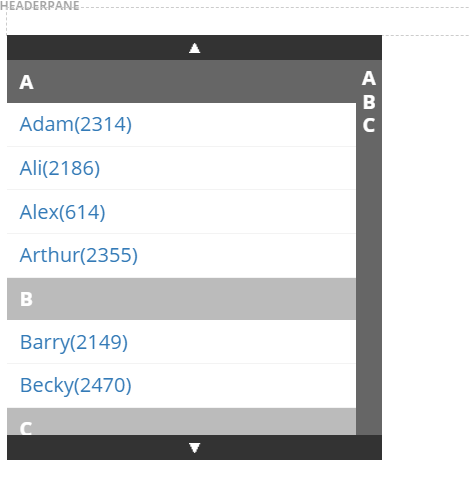
Display Arrow: After checking this option, there will be arrows displaying on the top and bottom of the box. This option is available in A-Z Type and Category Type.
Please see front-end as below.
SL03_TextLink
After you apply “SL03_TextLink” on “Choose Link Type” page, Link Settings page will display as below.
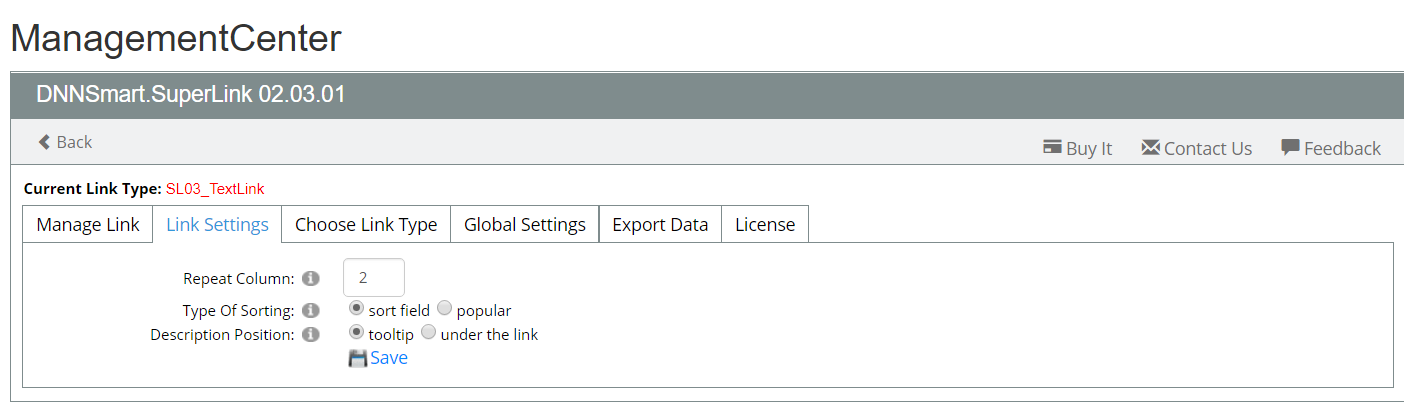
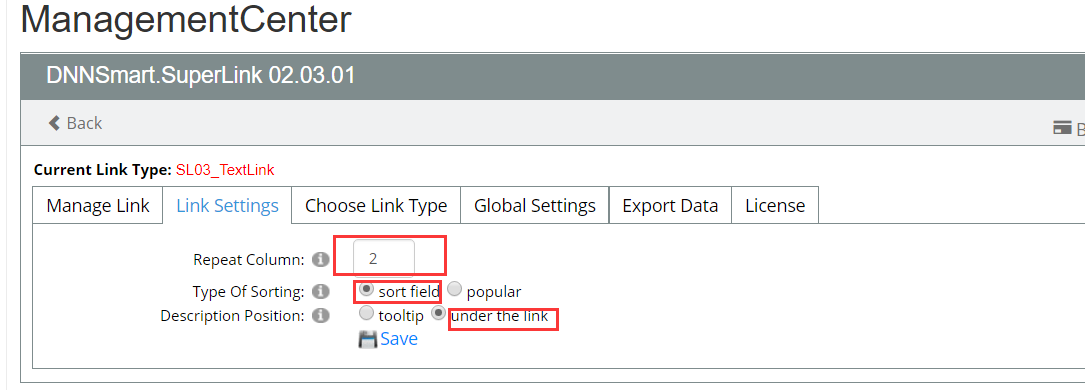
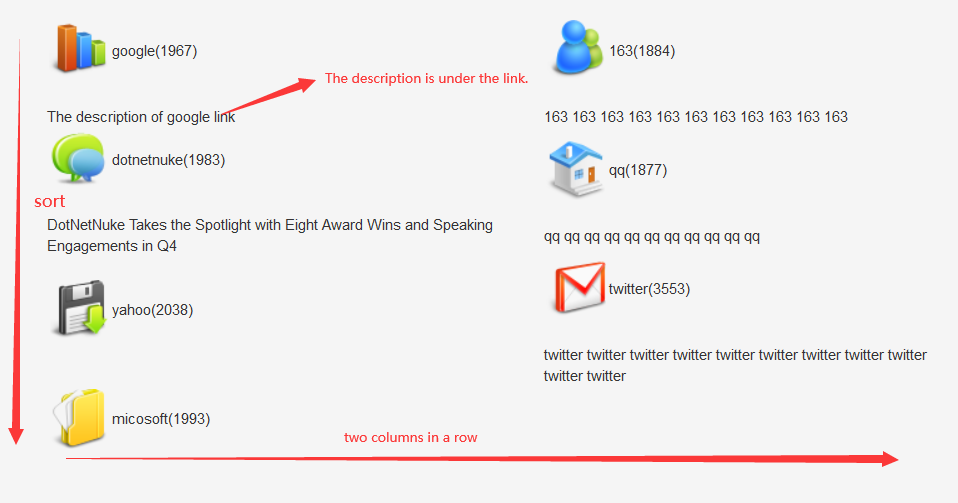
Repeat Column: How many columns are there in a row? If we input 2 here, it means that there will be 2 columns in one row.
Type Of Sorting: It will sort according to what. There are two options here. If you choose “sort field”, then links will sort according to the sort field. If you choose “popular”, then links will sort according to click count.
Description Position: It’s the position of description. There are two choices, tooltip or under the link.
We added several links as an example, manage link page is as below.

Link Settings page is as below.
Then front-end interface will display as below.
SL04_DropdownLink
In this link type, there’s no link settings page included. After you finish adding links, the front-end interface will display as below.
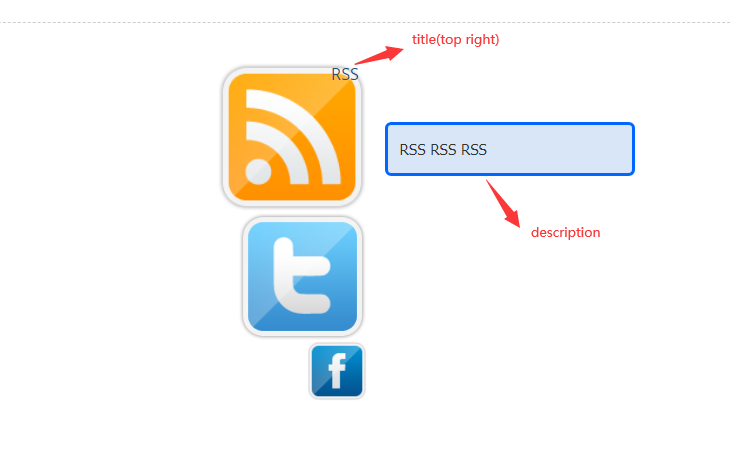
SL05_FishEyeLink
After you apply “SL05_FishEyeLink” on “Choose Link Type” page, Link Settings page will display as below.
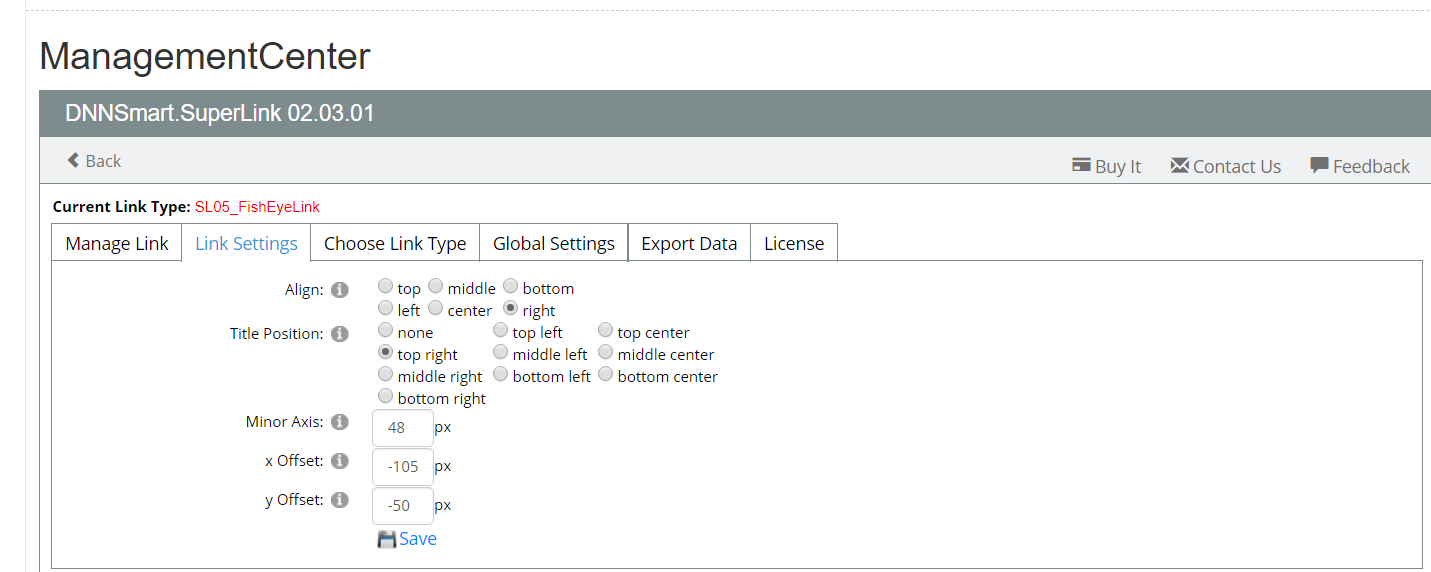
Align: Please choose a specific alignment for your added links, there are several options.
Title Position: Please choose one position to display the title of link. If you choose “none”, the title of link won’t display.
Minor Axis: You can adjust the size of link icon through this option. In default, it will be 48px.
x Offset: You can adjust the orientation of animation through this option. In default, it will be -105px.
y Offset: You can adjust the orientation of animation through this option. In default, it will be -50px.
We added several links as an example, then front-end interface displays as below.
SL06_TreeLink
After you apply “SL06_TreeLink” on “Choose Link Type” page, Link Settings page will display as below.
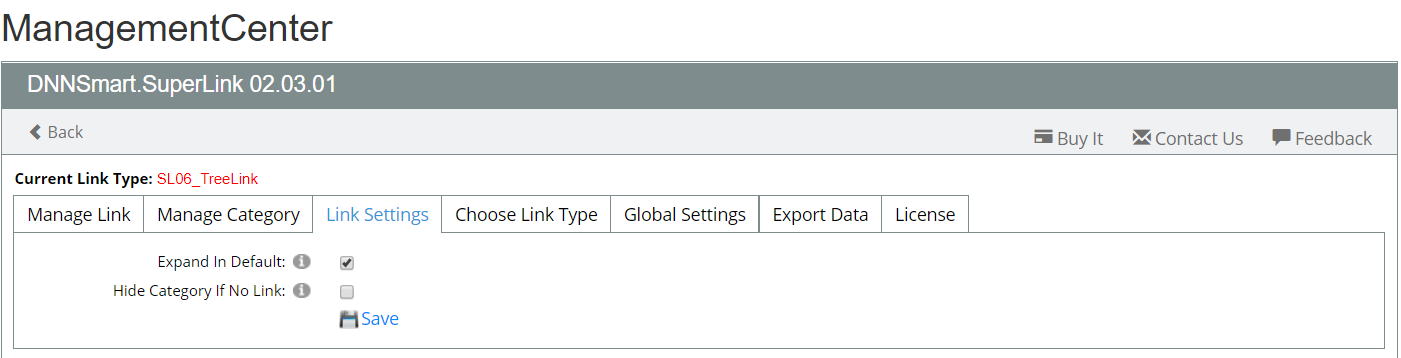
Expand In Default: If you check this option, added links will expand in default. If you uncheck this option, links will expand and display after clicking the category.
Hide Category If No Link: When you check this option, the category won’t display if there are no links belonged to this category.
We added several links and categories as an example. (Regarding how to add categories, please refer to intructions in "Manage Category" part above and add some categories according to your need.)

SL07_MenuLink
After you apply “SL07_MenuLink” on “Choose Link Type” page, Link Settings page will display as below.
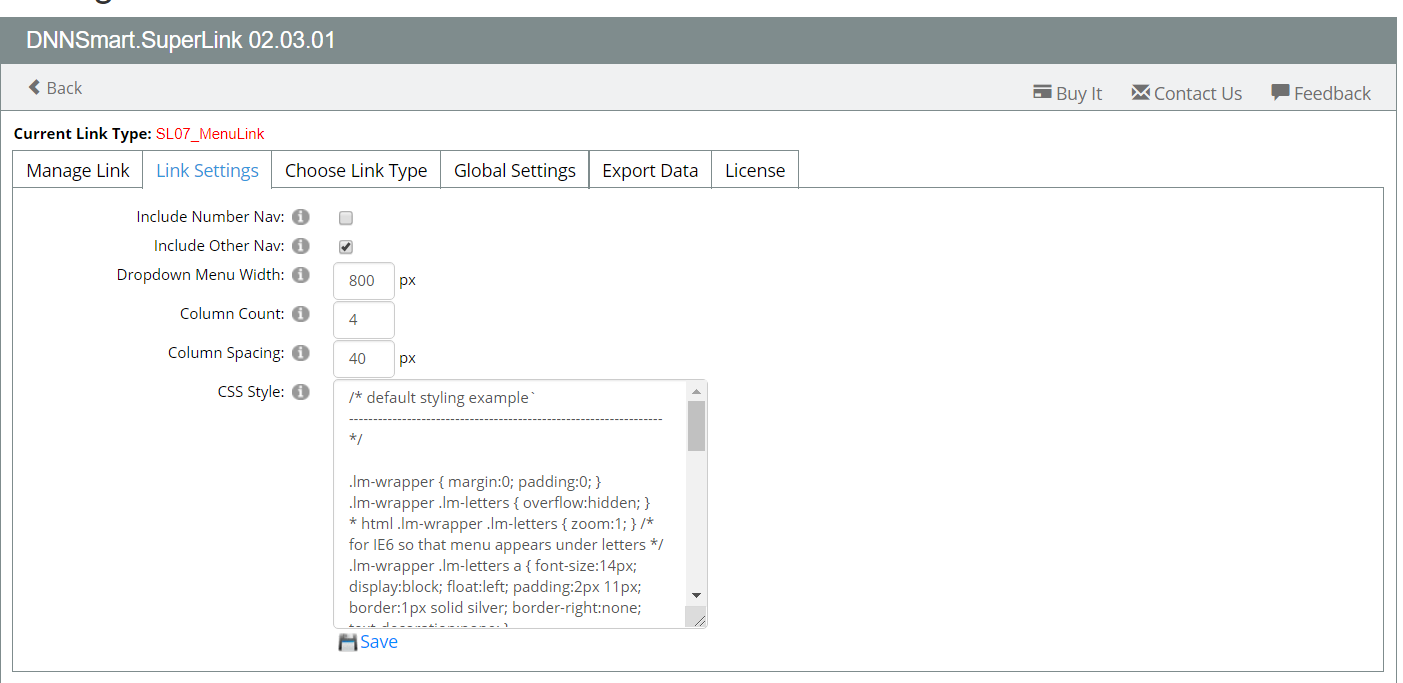
Include Numbe Nav: If you check this option, [0-9] navigation will show in the menu bar. If you uncheck it, [0-9] navigation will not show. You may want to uncheck this if your list does not contain links which start with a number.
Include Other Nav: If checked, [...] navigation will show in the menu bar. If unchecked, [...] navigation will not show. You may want to uncheck it if your list contains links which start with punctuation or characters other than A-Z and 0-9 (like Ä and Ü).
Dropdown Menu Width: You can define width of dropdown menu box.
Column Count: You can define how many columns to display in one row.
Column Spacing: You can define the spacing between two columns.
CSS Style: You can edit css file of this link type by yourself.
We added several links as an example, it displays as below.

Global Settings
On this page, you can do some basic settings for the module. This settings page is the same for all seven link types.
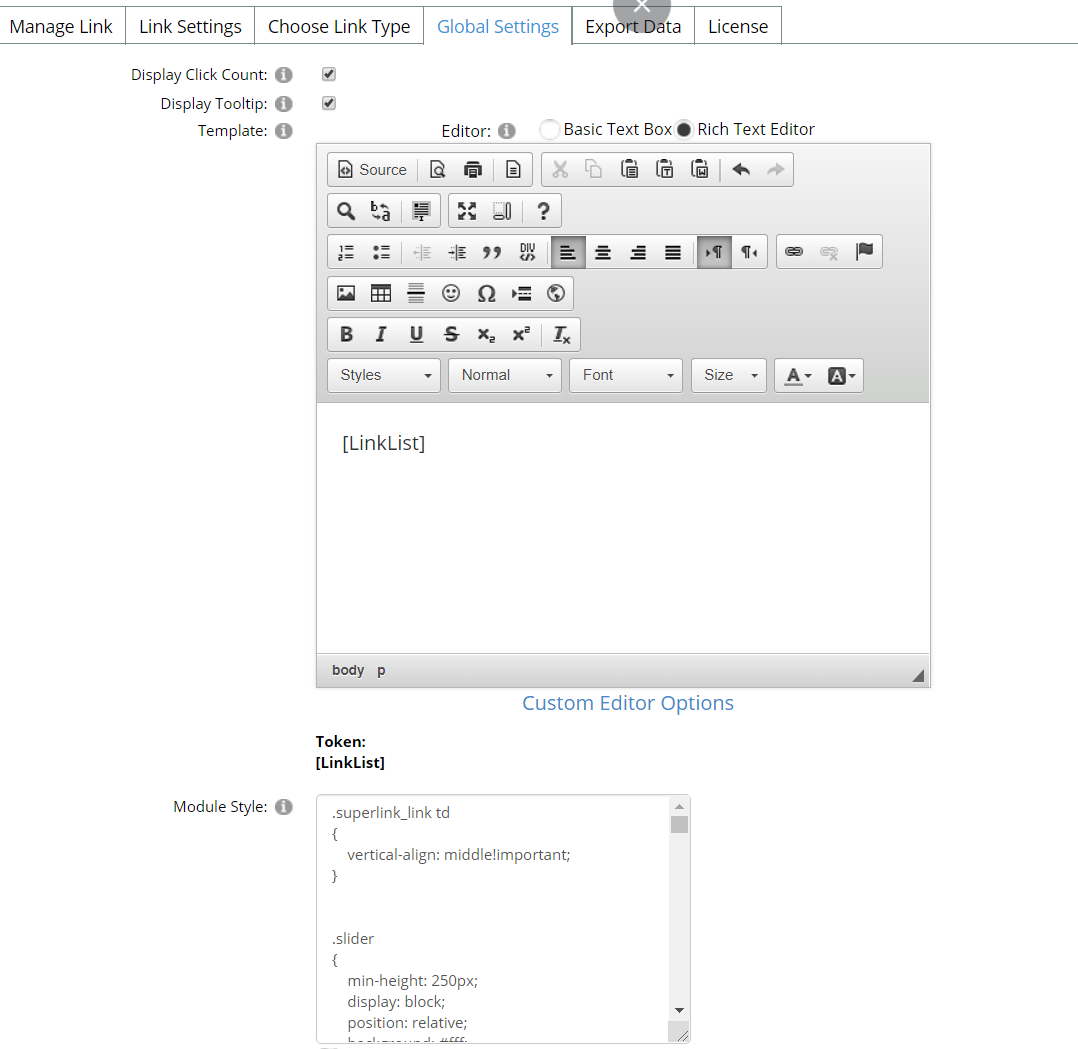
Display Click Count: After checking this option, click count of the link will display in the front-end.
Display Tooltip: After checking this option, tooltip effect will appear and description text of the link will be displayed.
Please see example below.
Template: You can adjust front-end interface here.
Module Style: You can edit css file of the module by yourself.
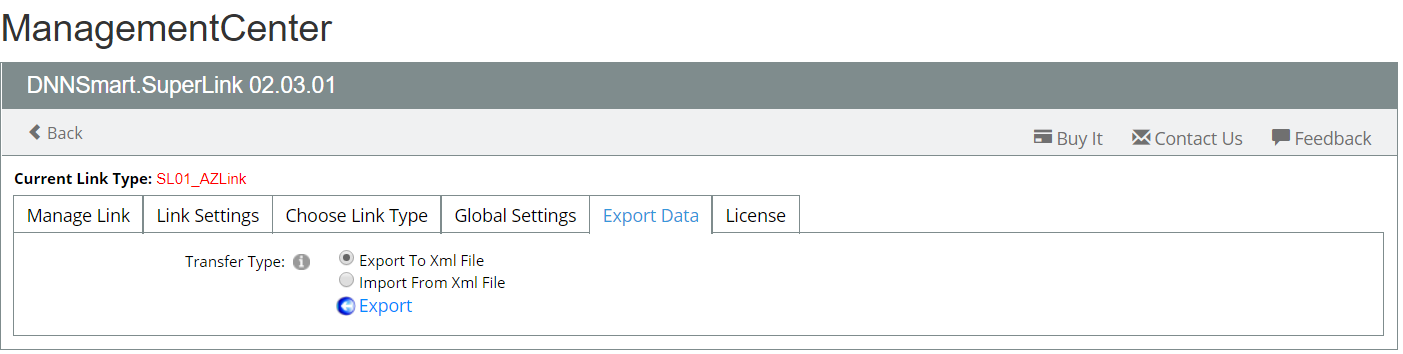
Export Data
On this page, you can import or export added links and categories. It is to facilitate users to transfer added items from one Super Link module to another Super Link module.
This settings page is the same for all seven link types.